Above Ground Pool Liners: How to Measure, Replace, and Get a Wrinkle-Free Fit
Above-ground pool liners are one of those “it’s simple… until it isn’t” projects. Most liner headaches come from two things: (1) ordering the wrong liner style/size, or (2) getting wrinkles during installation and not knowing what you can still fix once water is in the pool.
This guide covers two of the most common liner topics people look for:
- How to identify, measure, and replace an above-ground pool liner (the part that prevents wrong orders)
- How to prevent and remove wrinkles (the part that prevents regret mid-fill)
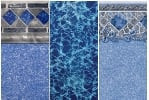
If you want to browse liner styles and patterns while you read, here are the most useful starting points:
- All Above Ground Pool Liners
- UniBead & EZ-Bead & Beaded Above Ground Pool Liners
- Expandable Above Ground Pool Liners
How to determine what liner type do you have? (Overlap vs Beaded vs Uni-Bead)
Before you measure anything, identify how your liner attaches to the top of the pool wall. This matters because the “right size” liner can still be the “wrong liner” if the attachment style doesn’t match your pool’s top track/rail setup.
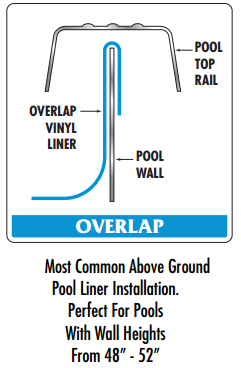
Overlap liner
- The liner material comes up and over the pool wall.
- It’s held in place with coping strips/top rails.
- Common on many 48" and 52" wall pools.
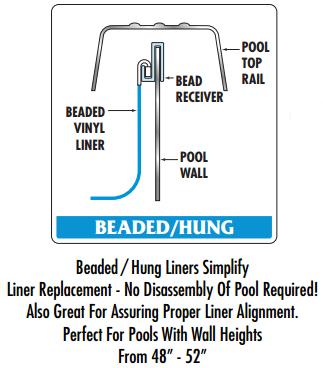
Beaded liner - Preferred Liner Type for Ease of Replacement
- The liner has a bead (a thick “lip”) that snaps into a bead receiver/track at the top of the wall.
Uni-Bead / EZ-Bead / J-Hook
- Designed to work in more than one setup (often can hook onto the wall or fit into a bead receiver, depending on the profile).
When should you replace an above-ground pool liner?
A liner usually needs replacement when you see one or more of the following:
- Leaks you can’t reliably patch (especially on seams or the floor & wall transition area)
- Brittle vinyl, cracking, or “dry” fading that feels 'stiff'
- Stretching/slipping at the top edge (liner dropping, bead popping out, or recurring wrinkles)
- Wrinkles that suddenly appear along with a “spongy” floor (can indicate water behind the liner)
Measuring for the correct replacement liner (the no-mistakes checklist)
You generally need five things to match the correct liner:
- Pool shape: round or oval
- Pool size: diameter (round) or length x width (oval)
- Wall height: typically 48", 52", or 54" (Actual Wall Height Itself)
- Bottom type: flat bottom vs expandable/deeper bottom
- If expandable/deeper bottom, measure depth from top of liner to bottom
- Attachment type: overlap vs beaded vs uni-bead
How to measure a round pool
- Measure straight across the pool through the center (inside wall to inside wall).
- Take 2–3 measurements in different directions and use the average as some pools, especially older pools can be slightly out of round.
How to measure an oval pool
- Measure the longest inside length and the widest inside width (inside wall to inside wall).
- If you’re between sizes, don’t guess—measure carefully and match to the closest true size.
How to measure wall height
- Measure from the bottom of the bottom track/base area up to the top of the physical wall itself (near where the top rail sits).
- Don’t assume—48", 52", and 54" are all common, and ordering the wrong wall height is a top cause of poor fit.
Flat bottom vs expandable liners
- Flat bottom liners are for pools with a flat floor.
- Expandable liners are for deeper bottoms that “drop” or are designed to expand to a deeper center.
Liner replacement: A Step-by-Step Overview
This is the practical sequence that prevents most installation issues. Always consult manufacture instructions or contact the company from whom the liner was purchased.
1) Pick the right conditions
- Choose a warm, sunny day if possible. Warm vinyl stretches and sets more easily. With the liner still in the carton, place in direct sunlight for 2 - 3 hours.
- Plan enough time to position the liner and start smoothing before the water gets too high to correct wrinkles.
2) Drain and disconnect safely
- Turn off power to all equipment and/or accessories going to the pool.
- Drain the pool below the return/skimmer and remove faceplates as needed.
- If you’re unsure about disassembly or gasket order, take photos as you go. That's good reference for re-assembly.
- Once drained, remove all face plates. It's good practice to place any removed screws in the pump basket, so they're 'right there' for re-assembly.
3) Remove top components (depends on liner type)
- Overlap: remove top rails/stabilizer rails/coping strips to free the liner around the top edge.
- Beaded/Uni-Bead: If needed to access the liner bead, remove enough top rail sections to access the bead track and release the liner.
4) Pull the old liner and prep the base
- Remove the old liner completely.
- Inspect the floor/base for roots, sharp debris, and low spots.
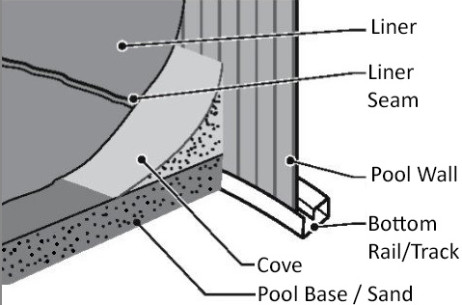
- Rebuild or smooth the cove (where the wall meets the floor). A solid cove helps prevent liner stress and wrinkles at the transition.
5) Set and hang the new liner
- Lay the liner in the sun briefly (still folded) so it becomes more pliable.
- Find the seam and align it evenly around the pool.
- Attach the liner evenly:
- Overlap: drape evenly over the wall and secure temporarily.
- Beaded: snap the bead into the receiver track evenly.
- CaliMar / HII / Doughboy Beaded Liner Instructions -1
- CaliMar / HII / Doughboy Beaded Liner Instructions -2
- Uni-Bead/J-Hook: hang per the liner profile and your top track setup.
6) Use the “vacuum set” method (wrinkle prevention)
- With the liner attached, pull the liner gently into place.
- Many installers use a shop-vac to pull air from behind the liner (often through the skimmer opening) so the liner “sucks” tight against the wall and floor before filling.
- If you use this method but the liner does not seem to be "pulling" back to the wall and bottom, check for vacuum leaks.
- Typically, it's recommended to run the vacuum to pull the liner back until there is approximately 6" of water in the pool.
7) Start filling and correct wrinkles early
- Begin filling slowly.
- When there’s about 1/4 to 1/2" of water, you can still move and smooth the liner floor.
- Work wrinkles from the center outward toward the walls.
8) Install faceplates at the right time
- Don’t cut openings immediately.
- Wait until the liner is firmly set and stretched correctly at the skimmer/return area, then install gaskets/faceplates and cut the vinyl inside the opening.
9) Finish assembly and balance water
- Reinstall top rails securely.
- Once full, start circulation and balance the water. Good chemistry extends liner life.
How to get wrinkles out of an above-ground pool liner (before and after filling)
Wrinkle removal depends on when you catch them. The earlier, the easier.
Best time: before filling (or with a vacuum set)
- If the liner isn’t tight yet, stop and reset it.
- If not using constant vacuum method and you see misalignment and/or wrinkles, re-center the liner seams and re-run the vacuum set so the liner lays flat.
Still very fixable: with approximately 1" inch of water
- Get into the pool in clean socks (or bare feet) and push wrinkles outward.
- Work slowly from the center toward the wall.
- Don’t “trap” a wrinkle by pushing it into a corner—keep it moving toward the outer edge.
Harder but possible: with several inches to about a foot of water
- You can sometimes still shift wrinkles, but it takes more effort and you risk stressing the vinyl.
- If wrinkles are severe, drain back down to the “workable” depth and reset.
Wrinkles that return or feel “spongy”: check for water behind the liner
If wrinkles appear suddenly after the liner was smooth, or the floor feels squishy, you may have water behind the liner (groundwater intrusion or a leak path). That’s a different problem than normal installation wrinkles and may require targeted draining and correcting the source.
Common liner issues and what they usually mean
- Liner feels “too small”: often wrong size/wall height, or the liner wasn’t warm enough to stretch and set. Though liners are not designed to naturally lay back completely against the wall and across the entire pool bottom and wall. They are pliable and made a 'bit' smaller to allow the liner to stretch into place.
- Bead pops out of the track: water may be too low (liner shrinks) or the bead wasn’t seated evenly. Lower water slightly, re-seat the bead carefully, and refill.
- Wrinkles at the wall/floor transition: frequently caused by a weak/uneven cove or an uneven base or even a slightly twisted liner.
- Liner “floats”: typically groundwater behind the liner; wrinkles can return even after a good install.
Where to find above-ground liners on ProPools
- Vinyl Liners for Above Ground Pools
- All Above Ground Pool Liners
- UniBead & EZ-Bead & Beaded Above Ground Pool Liners
- Expandable Above Ground Pool Liners
If you want a simple rule: measure carefully, match the attachment type, prep the bottom base like it matters (because it does), and treat wrinkle removal as a “less than first inch of water” job—not a “we’ll fix it later” job.