There are a lot of questions homeowner's ask about installing an inground pool which is why we created this repository of pool construction information in a question answer format. After decades of construction the one thing we know for certain is that not all pool installations are the same. In fact 99.9% of all installations are different primarily due to the condition of the yard, skill set and shape of pool. Though the vast majority of installations are different the construction questions asked generally can be answered in very similar ways.
Excavation Questions
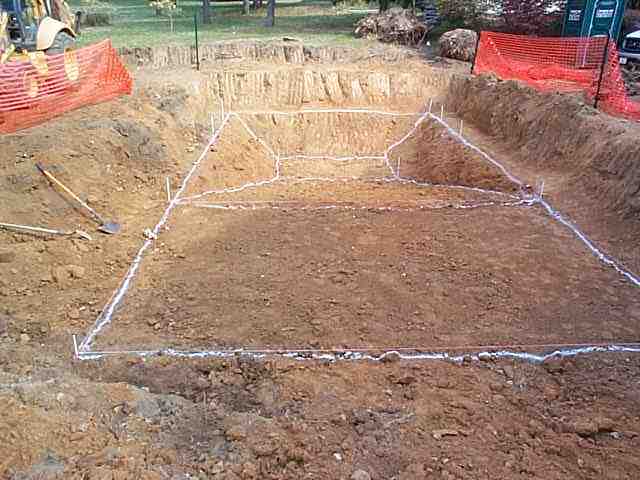
Q. How deep should I excavate the shelf/shallow end of the pool?
A. Once you establish the pool elevation/benchmark of the top of the pool wall, excavate 42" down from that point. This is where the typical 42” wall would naturally sit without coping attached. This is depth of the shelf around the entire pool where all of the panels will sit. This shelf is the same in the shallow end as well as the deep end. The entire shallow end should be excavated to the same depth as the shelf. You will constantly be using two terms, dig dimensions and finish dimensions. Be sure you understand both terms and how to move between then during the construction of your pool.
Q. How deep should the hopper in the deep end be excavated?
A. Always dig the hopper in the deep end 2" deeper than the pool’s finish depth. Example: If the finish depth of deep end is 8', dig hopper area to a depth of 8'2" from the benchmark or the top of the 42" panel without coping installed. This will allow for the installation of 2" of bottom material, such as vermiculite (pool base) or sand-and-cement mixture in the bottom of the hopper.
Q. Will excavating the shelf area around the pool leave enough room for the braces?
A. The panel line you have will dictate the brace size and the amount of overdig in the shelf area. The standard overdig for an inground pool is 3’ of shelf space.
Q. The installation manual advises not to over dig, what does this mean?
A. Extreme care should be taken when digging any depth or slope of the pool, especially in the hopper or deep end of the pool. Carefully mark the shelf area where the walls will sit using marking paint or strings with pins. Do not let the excavator dig past your marks or strings. You may want to hand shovel (trim) during this procedure to keep the excavator away from the shelf, thus keeping the shelf edge intact where the walls will sit. Keep in mind that all walls in the hopper area slope at various angles, thus the term “hopper bottom”.
Q. When digging and encountering ground water, what are some options?
A. The most common option is to use a self-priming pool pump like the one for your pool package. All plumbing should be schedule 40 PVC installed as shown in the installation manual. Cap the pipe and drill as many 3/8" holes as possible in the tailpiece buried in the gravel/rock below grade. Make sure all plumbing joints are tight so you can pump the maximum amount of ground water from beneath the pool during the construction of the pool.
|
|
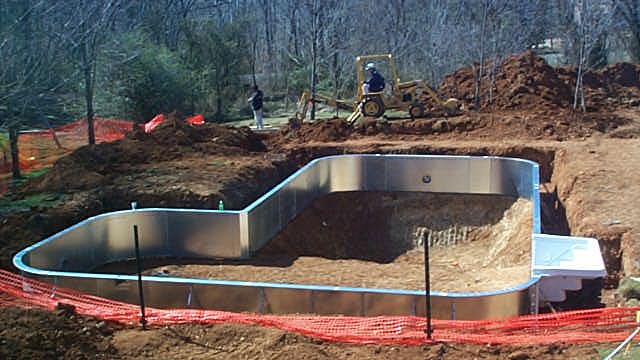
This is a good clean over all picture of the pool. The outside white lines represent where the pool walls will be sitting.
(Not withstanding leveling and squaring) Notice down the sides and across the back of the pool there is approximately a 2' walkway.
This will allow enough space for the concrete footer which gets poured behind the pool walls at approximately 4-6 inches deep.
The concrete footer will next have gravel placed on top of it the following day. Then the plumbing can be placed around the perimeter of the pool and have plenty of room to work.
Notice for added safety we keep an orange safety fence around our job sites so no one will accidentally fall into the hole. It is open in the image in order for us to work but when ever we leave the job we are certain that the security fence goes around the perimeter of the work area or at least the pool hole. |
More about Excavation
Finish-Dimensions Questions
Q. What do dimensions refer to?
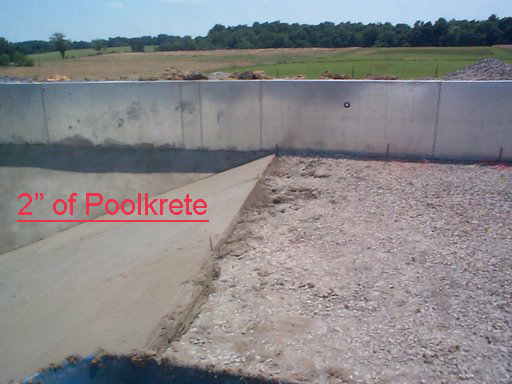
A. Finish dimensions refer to several areas of the pool. Most of the time they refer to the interior of the pool, both length and width, as well as depth measurements. Example: A 16' x 32' rectangle pool that is 40" in the shallow end and 8’ in the deep end would measure 16' wide and 32' long on the interior of the pool walls. The depth of the pool would be measured from the top of the wall (without coping attached) to the bottom material. The bottom material comes 2" up the wall panels to the grade following the entire inside perimeter of the pool. Panels have a scribed line at the 2" mark.
|
Any finished dimensions would be from the top of the 2" of Poolkrete on the pool floor.
|
Q. What standard dimensions are on the drawing you receive with your package?
A. All dimensions on your drawing are dimensions, with the exception of the panel-shelf detail. Remember to add 2" to all depth dimensions to allow for the 2" of bottom material needed later. This applies to the panel shelf as well. Typical panels are 42" high, and the inside the pool is 40", up 2" on the panel. All depth measurements are from the top of the panel with no coping installed.
Panel-Installation Questions
Q. How tight should the panel bolts be?
A. All panel lines need to have the bolts tight and secure. Do not over tighten. Two of the panel lines properly connect one panel to the next.
Q. How level should the panels be?
A. As with any construction project involving walls and footing, the walls need to be level, square and plumb (perfectly vertical) before the footer/collar is poured. After the panels are bolted together, they need to be leveled by using the transit to level all panels to every other panel. While this step is progressing, continue to square the pool also. After the pool panels are level and square, make sure they are plumb. After this is complete, and after the braces are all set, it is time for the collar to be poured.
Q. How do I bolt the panels to the step, in-wall ladder, cozy cove spa or a swim out?
A. After leveling the step following the manufacturer’s instructions, clamp the wall panel to the steps so that the flanges on the side of the step align with the top and face of the panel. If wall stiffeners are in your way, mark all holes with a marker, remove step from panels and drill holes where marked on step flanges. Remember, one panel line has an alignment feature on one side that must be removed at this time so the steps will bolt flush to the panel. Hydra and Cornerstone panels do not require this step.

Q. My soil is too rocky or hard for the polymer stakes, what can I use?
A. Steel stakes are available as an up charge on all panel lines.
Q. What consistency should the concrete for the collar (bond beam) be?
A. When ordering concrete for the bond beam/collar, it should be 3,000 psi rating with a minimum of 5" slump. This allows the concrete to flow around the braces.
NOTE: Always check walls for straightness and plumb before concrete sets.
Aqua Genie Skimmer/Return Installation Questions
Q. How is the Aqua Genie installed?
A. The Aqua Genie is mounted from the back of the panel with the face of the Aqua Genie extending through the precut hole in the panel. It attaches to the back of the wall using eight number-10x3/4” self-tapping screws.
Q. The Aqua Genie has three holes for plumbing lines, which goes where?
A. There are two holes below the point at which the basket sits in the main body of the Aqua Genie. One is 1-1/2" and the other is 2". One will be your suction going to the front of the pump, located at the equipment pad. The other will be plugged in such a manner to insure a watertight seal. The third hole is located under the throat of the Aqua Genie; this is where the clean filtered water returns from the filter. Two terms used often in the pool industry are suction and return. The pump located at your equipment pad is the center point. If you are standing over the pump, any plumbing lines coming from the pool to the front of the pump are called suction lines. Any lines leaving out of the top of the pump to the filter, heater, salt generator and the like and eventually going back into the ground and back to the pool are called return lines. We have suction lines and return lines.
Q. Where should the Aqua Genie be placed in the pool perimeter?
A. Always locate the Aqua Genie as close as possible to the center of the long wall on a rectangle pool. Larger rectangle pools may require two, L-shaped pools may require two or more, and free-form pools have requirements that are noted on your layout drawing.
Q. Where do I order replacement parts?
A. Aquagenie.com for any replacement parts. An exploded view with a Bill of Materials is provided.
Q. How do I pressure test the Aqua Genie?
A. Place expanding plugs in the bottom on the suction line. Place a blanking plate on the the nozzel and plug the stainless steel feeder tube. Fill the lines with air and check the gauge for any drop in pressure.
Q. How do I winterize the Aqua Genie?
A. We recommend using our Aqua Genie winter cover, part 3-H03116N. This covers the inlet and return of the Aqua Genie. With this cover there is no need to remove the faceplate. Place the covers bolt through the inlet and tighten until the gasket is snug. Blow out the plumbing lines to remove all of the water. Pour a couple of gallons of RV or Swimming Pool antifreeze into the suction line underneath the basket.

Aqua Genie Skimmer / Return Water Flow Pattern
Q. Why don’t I need separate returns when using the Aqua Genie?
A. The Aqua Genie has a built in return which turns the water over in the pool. With the specifically engineered design of the Aqua Genie return and the design, shape and positioning of the Aqua Genie location in the wall system there is no need for additional pool returns.
Q. Where should the Aqua Genie be placed in the pool?
A. Always locate the Aqua Genie as close as possible to the center of the long wall on a rectangle pool. Larger rectangle pools may require two, L-shaped pools may require two or more, and free-form pools have requirements that are noted on your layout drawing.
Step-Installation Questions
Q. How do I support the Sweetwater Steps during installation?
A. Sweetwater steps come with our new PVC and ABS step-alignment system. This is the leveling system to support the step during and after installation. This leveling feature attaches PVC legs to the injection-molded tread support mounted under the step treads. The legs will be anchored in the concrete collar when poured around the pool perimeter. With the proper backfill installed, this should give you a lasting foundation for your steps.
Q. When I install coping up to the side of the step, the vertical faceplates on each side of the steps get in the way. What should I do?
A. Cut the vertical faceplate and beauty strip about 1/2" below the liner track on the coping. This will allow the coping an easy transition from the top of the wall to where it butts up to the side of the step.
Q. When should I remove the faceplate extrusions from the step?
A. Leave them attached until you are ready to install the liner. Remove the beauty strip, and before removing the faceplates, mark right/left and top. The horizontal strip across the bottom of the step should be marked right and left also. THEY CAN BE REINSTALLED INCORRECTLY. All screw holes are pre-drilled to match the faceplate. The gasket is installed and covers the pre-drilled holes. You will want to align them perfectly when installing the strips over the liner.
Q. Where should I place the step returns if installed?
A. Installation should be on the flat area on either side of the step, as you walk down into the pool. Placement of the return/jet fitting should be about 12" to 15" down from the top of the step. This fitting is #SP1023. This fitting has three gaskets, two rubber gaskets and one fiber gasket. The hole size for the step return is 2-1/2".
Q. When should I put the faceplates on to secure the liner to the step?
A. The water in the pool (shallow end) should be deep enough to push the liner vertical to the step. The liner at the bottom of the step should be at a 90º angle from the to the step, no space. Once this has been accomplished, attach one vertical faceplate and then the other vertical faceplate to the step. Tighten and secure each screw. Once this has been done, install the horizontal faceplate. If there is any doubt as to how the faceplates are to look when installed, take a picture before their removal, showing step detail with beauty strips removed.
Once the liner is pulled back sufficiently install the face plates on the steps and remove the liner as shown above. |
Q. How do I support my Sweetwater 6’ swim out?
A. The width tread of the 6’ swim out has a large surface area. Due to the weight of the water on this area it is best to support it with concrete block piers. Place 4 piers across the bottom length of the swim out, where the blocks touch the bottom of the swim out. Place a treated or composite board across the whole length. When the collar is poured this will keep the blocks in place.
Q. How do I clean the steps and swim outs?
A. You can clean the steps and swim outs with a soft scrub cleanser with bleach. For stubborn stains you can use an automotive rubbing compound.
Q. I need to replace my step screws, gasket, and faceplates. What parts do I need to order?
A. For Sweetwater steps the step screws are number 10 x 1” pan head stainless steel. The replacement screws are part number H01906 sold in a pack of 50. The faceplates and gaskets can be ordered and they are part numbers H0543UD for the faceplates and I02631 for the gaskets (2 required for an 8’ step), holes are not pre-drilled. Use the old faceplates as a guide to drill the new faceplates.
Q. How do I winterize step/swim out jets or main drain?
A. Remove the internal jet. Carefully turn the jet with slow even pressure, USE CAUTION WHEN TURNING THE JET, TO MUCH FORCE WILL BREAK THE INTERNAL TABS AND A NEW JET WILL BE NEEDED. Place an expanding rubber plug in each jet openings. Remove or open the air valve all the way. Blow air through the lines until the water is removed. For the main drain blow air until you see bubbles coming from the drains, quickly close the valve at pump. Pour RV or Swimming Pool antifreeze through the air valve and close.
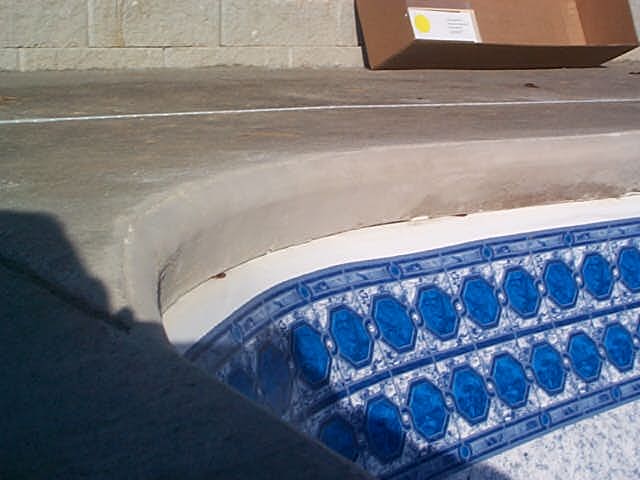
Coping-Installation Questions
Q. Do I need to cut the coping to fit?
A. Both our bull-nose and cantilever coping will require some cutting to fit. This can be done with a hacksaw, sawzall, jigsaw or a compound miter saw with a metal cutting blade.
Q. Some of the coping clips pop . How can I correct this?
A. Make sure the joint where the coping sections meet is even. You may have to tap one or the other with the palm of your hand to align them evenly. Take the coping clip and bend it slightly into a tighter radius. Take a small amount of clear silicone and apply to the inside of the clip before installation.
Q. I have cantilevered coping. Where are my coping clips?
A. Cantilever coping does not require clips. You will need self-tapping screws only.
Q. During installation, my coping was scratched. How could I repair the finish?
A. This can be touched up with paint supplied where you purchased your pool kit. It is a specially formulated paint for the coping. It is sold in 12 oz. cans and the part number is HO2974.
Q. Can I tape the coping to protect it when pouring the deck?
A. Painters tape can be used along the coping edge. Apply just prior to pouring the deck. If there is adhesive transfer, use a rag and a product called GOOP or GOO GONE to remove. This is available at most major home-improvement centers.
Liner-Installation Questions
Q. My liner is either to big or to small?
A. Vinyl liners are temperature sensitive. If it appears too big, take the liner out of the track and let it relax in the shade in the bottom of the pool. Wait until the early morning to re-install the liner. If the liner appears small take it out of the track and let it relax in the sunlight. Wait until mid-afternoon to re-install the liner. In the fall, winter, or early spring keep the liner in a heated area until ready to install.
Q. My liner bead will not stay in after I installed, what can I do?
A. An extruded product known as liner lock is available to assist in keeping the liner in the liner track and it is widely available online and in most pool stores. Additionally you can use various thickness coins as in the picture below to also temporarily hold the liner in the track. Usually once the liner is completely installed, yet prior to being filled; the liner lock or coins can be removed from the track. Should the liner pop back out of the track, replace the liner lock. Once the pool is full of water, do NOT remove the liner lock as it will be extremely difficult to get the liner back in the track. It can be done but it is very difficult.
There are times when the liner will pull out of the vinyl liner track.
If you run out of liner lock it is possible to use coins to wedge the liner in the track. |
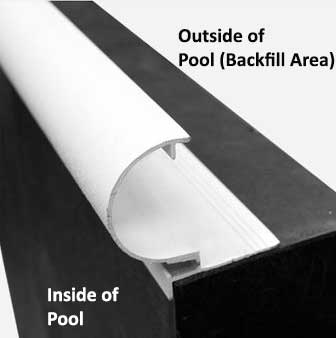
Here's a Side View Close-UP of How a Liner actually fits into the Liner Track. This is only a sample Picture, in the field the liner is one continuous piece around the pool.
|
Q. I need to patch/repair my liner, what should I use?
A. Most pool supply or some home improvement stores will carry a pool vinyl liner repair kit. You can also find these kits at propools.com.
Q. I ordered a safety ledge and I do not see it on my pool?
A. Sometimes with our liner design software, the safety ledge is designed into the pool, this eliminates seam.
Q. Where do i findthe serial number for my liner?
A. The serial number will be on the warranty card and on the liner. Look in the deep end, on the back of the liner, it will be placed 1'-2' from the center of the deep end near the top of the liner.
Q. How do I line up the liner of a free form pool?
A. Look for the seam at the back of the hopper where it meets the slope. Use this to line up the deep end. For the shallow end look for a seam closest to the break, it will be parallel.
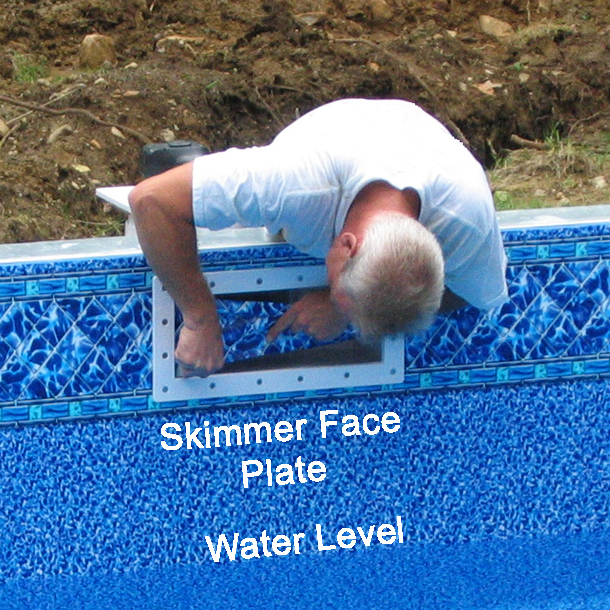
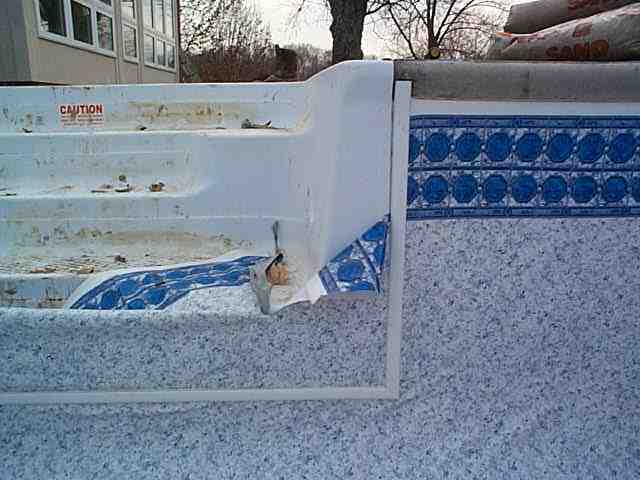
Once the liner is installed and the pool water level is only a few inches away from the skimmer opening, it's time to carefully and securely install the skimmer face plate in place with all screws. Then cut the liner on the inside of the skimmer face plate as shown in the picture.
|